|
Actor Studio for Beginners
This Tutorial is for making clothes that fit any skin tone. Using PSP 8
by xSaharax
Download Tutorial (PDF)
Download Body Templates (.zip)
First Things First
1) Make a folder somewhere you can remember and name it whatever
you want. This is where you'll be saving your images to.
2) Paint Program(Paint Shop Pro, Paint, etc)
3) MMG Tool(can be downloaded from the moove shop under
Developers)
4) Body Part Templates
5) Under C:\, make a folder named ASM to save all your ASM's to.
Parts That Make Studio
1) JPG image(s)
2) BMP image(s)
3) MMG
4) ASM
Body Templates
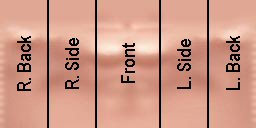
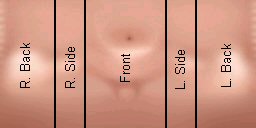
These are flat pictures of 3D models so they can be confusing to look at. Here they are laid out so you can get an idea
of what's what.
|
| Chest |
|
|
| Hips |
|
|
|
Getting Started - JPG's
Ok, I'm going to make a shirt for you to follow along with. To make a shirt you need to open in your paint program the
template(s) your wanting to use. The templates needed depend on the style of shirt you want.
EX: Short sleeveless shirt/ bra, you will only need to use the "chest". Sleeves.. add "arm" and so on.
I'll be using the chest, hips, and arm in my examples.
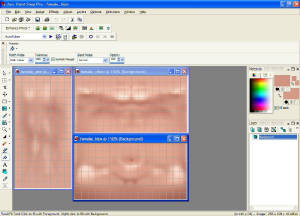
Now that you have an idea of what you want to do, start painting your templates how you want them to look
After you've finished painting, name your template(a) and save them as JPG's into the folder you created earlier. DO
NOT change the sizes of these templates, they are already the correct sizes.
BMP/ Mask Colors
First we'll go over the colors used for BMP's. All colors must be used in order, the BMP doesn't need to be pretty.
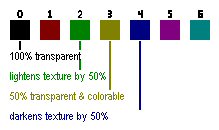
The colors shown above are used on you BMP for altering the texture of your image only. Olive Green(3) is the only one
of these colors that will also make your shirt colorable.
Black(0) - complete transparent color, use this where you want skin to show.
Dark Red(1) - no difference, unusable
Green(2) - Lightens texture, use on parts you'd like to show up lighter then the rest or use all over, Not colorable
Olive Green(3) - makes texture 50% transparent, can be used only where you want slight transparency or all over. Colorable
Dark Blue(4) - darkens texture by 50%, use in spots or all over. Not colorable
Purple(5) and Teal(6) - no difference, unusable
And yes you can use these colors on your JPG. The JPG can look anyway you want it to with any colors. The BMP is the
only place the colors matter.

Here are the colors to use if you want your shirt colorable all over or in more than one place. You can have up to 8
different areas of coloring. ALL colors must be used in order.
Light Grey(7) - First colorable area, or use all over for all over coloring.
Dark Grey(8) - Second colorable area.
Red(9) - Third colorable area
Lime Green(10) - Forth colorable area
Yellow(11) - Fifth colorable area
Blue(12) - Sixth colorable area
Pink(13) - Seventh - colorable area
Turquise(14) - Eighth colorable area
White(15) - No Change, use over parts or all over to keep your texture the same as you painted it.
Hint: If you want your shirt colorable, do not use dark colors on your main images. This will cause
an unwanted change in studio.
Making the BMP/ Mask
Still with me? Don't forget to save your JPG's before moving to this part.
With your JPG's still open, it's time to turn them into BMP's. This is basically like a negative of your original
images and helps Rose know whether something is to be colorable or not in the ActorStudio. This can freak ya out a bit after
spending all that time painting, but don't worry. That is unless you started this part without saving first lol.
The images I'll be showing for now are not colorable.
Above is my sleeve. Left: I've painted "white" over my sleeve, this means that it will Not be colorable
once in studio. To have it colorable you'd paint it "light grey" instead. Middle: Shows that I painted the
skin "black", therefore it will be a short sleeve with not particular skin tone visible. Right: All pieces
finished.
Do these steps with all your images. Use the color charts above if you would like your shirt colorable or a texture change.
Remember to keep the colors in order.
When you're done destroying your work... lol j/king
Ok when your done making the BMP's, you will need to reduce the color depth on ALL images before you save. To do
this:
Go to "Image\ Decrease Color Depth\ 16 colors(4bit)"
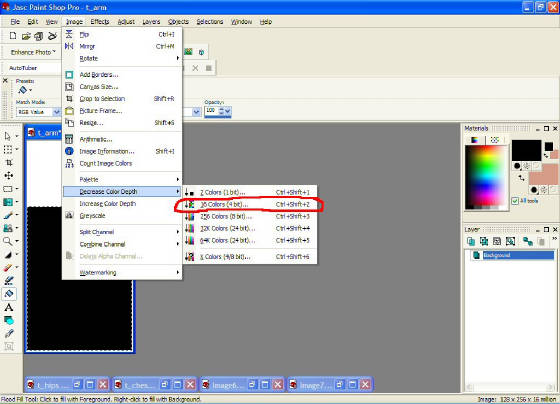
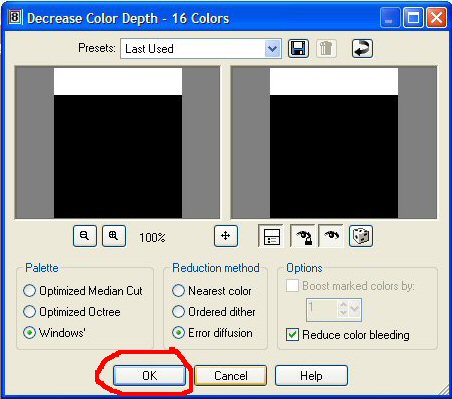
Notice the settings on the last picture.
After you've reduced color to all images, Using the same name and place as you JPG's you can now save as BMP.
EX: tshirt_chest.jpg, the BMP would be tshirt_chest.bmp, tshirt_hips.jpg is tshirt_hips.bmp etc.
Making the MMG
Make sure to stop at Moove Free shop under Develpoers and download
the MMG Tool.
1) Open it and click "New".
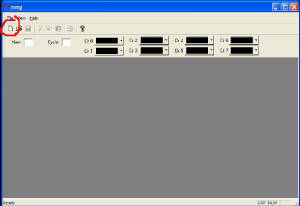
This is the "new" screen. There is only 3 things we will be messing with here.
Base File Name - this is your JPG
Mask File - your BMP
Output File - this will be the file that puts your images into Rose.
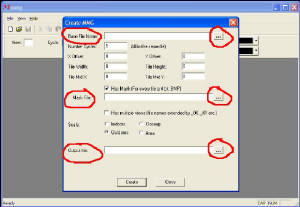
2) Click the "..." after where it says Base File Name. Use "Look in" to find the folder where you saved your images to.
Once there open the first JPG of your shirt.
3) Same thing, Click "..." after Mask File. "Look in"(if not already there) and open the coresponding BMP. Should
have same name as JPG you just did.
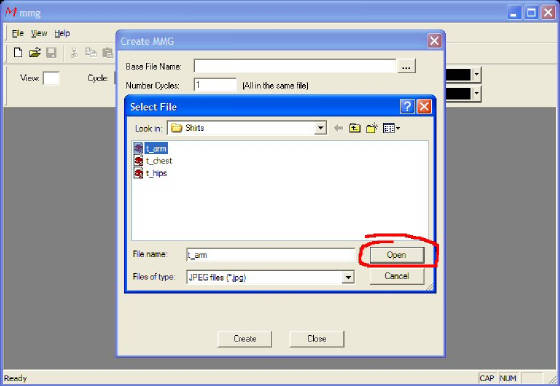
4) Now click the "..." after Output File. NO your not looking for a file despite what it looks like. Use "Look in" to
get to your moove\ art\ mmg folder. Once you're there, in "File name" type in the same name that your JPG and BMP have. Click
"Open".
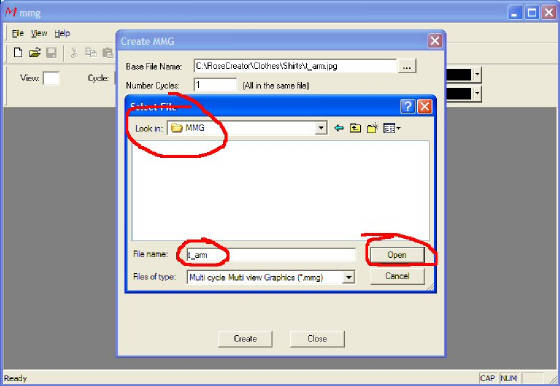
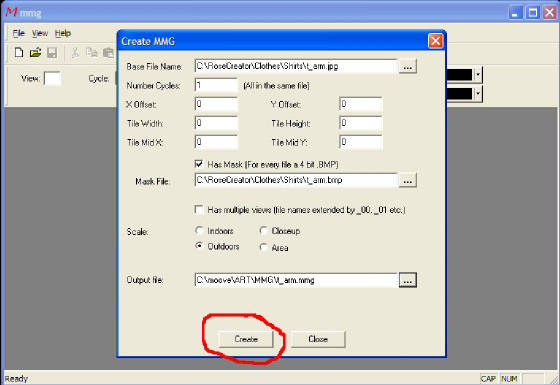
Make sure all 3 lines have the same image name.
5) That little window closes, now click "Create".
Repeat these steps for each image of your shirt ei, I did the arm there, so 'd have to go back and do the same steps
for the chest and hips.
Making the ASM
Ok now hat you have your JPG, BMP, and MMG's made it's time for the ASM. These can be VERY touchy. Since we're just
starting out we're not going to get into all the dimesions and SRF's for now, we'll get to that once you have the basics done.
If you want you can go to the Moove shop develpoers and download the pre-made clothes by the MMG Tool and take a look at how
some more envolved ASM's are wrote out. But for the shirt we're making now it's pretty plain and simple.
To make an ASM you need to open your notepad. These are the main parts of the ASM we need to worry about right now.
LEVEL - is orfer of clothes, whether something can go over something or not.
Some LEVELs for things are:
0 - would be on body itself
500 - for hair, earrings
600 - hats, bunny ears, etc
1000 - socks
2000 - shoes
3000 - pants, skirts
4000 - shirts
5000 - jackets
MAXCOL - tells Rose if and how many areas are colorable in studio. Goes from 0 - 8
Body Part - chest, hips, etc ... body part image or object is attached to.
ADD - this is your image
Now that's all out of the way we'll get started on the ASM we need for this shirt. Like I said it's pretty plain and
simple, when done if will fit any body and any skin tone.
1) We need to define the LEVEL and since this is a shirt we'll go with 4000.
2) Set the MAXCOL, my shirt is not colorable so it would be 0, if your trying colorable then set it to how many colorable
areas you want.
3) Define the body part(s) being used and what image goes to them. You only define the parts you've painted, if you only
used the chest then that's the only body part needed in your ASM.
This is what the ASM looks like for the example shirt:
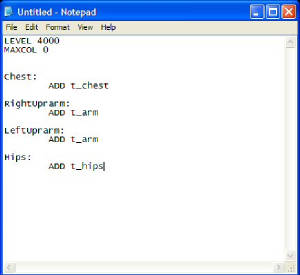
Remember only define the parts you've used. Once you think you got the ASM right you need to save it to your ASM folder
under C:\, if you didn't create that folder yet do it now, make sure it's named ASM.
You can save your ASM with any name you want, just make sure you save it with .ASM after it.
Installing into Rose
Well now comes the moment of truth whether it works or not. But first we need to set up Rose to be able to use the command
to install, so open up your Rose. And no you don't need have to sign in, go to file(very top left corner or screen0 and click
Use Offline.
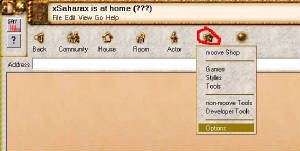
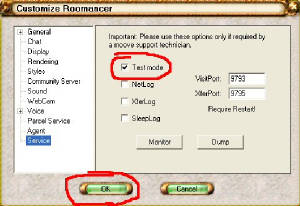
Got it open and ready? ... Now click "Extras\ Options\ Service" and make sure "Test mode" is checked.
|
|
|
ok now we're ready to install are lovely shirt :)
There is a command that you need to know by heart or just copy and save it somewhere.
!ASMFileToOutfit("c:\\asm\\yourfilename.asm","c:\\moove\\Outfits\\yourFolderName\\yourfilename.outfit")
You put this in your chat area, change where ever it says your... to your file/folder infos then
send. You should get a True or False. If you get False, you probably over looked something
and will need to go back through and check. Usually it ends up being something in the ASM or forgot part of the MMG, named
something wrong, or forgot something in the command line. Can also be your images themselves. And if you get a True, well
then you're ready to rock and try on your shirt.. hopefully.
You can get a True and then go into studio and nothing shows up. If this happens it's more then
likely one of your images. Recheck them, make sure no sizes where changed, color was decreased and that you used the right
color(s).
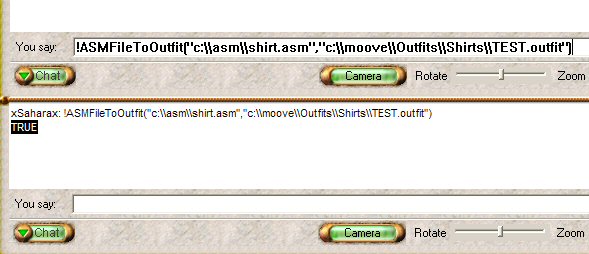
As you see I got a True, so lets see what it turned out like huh.....
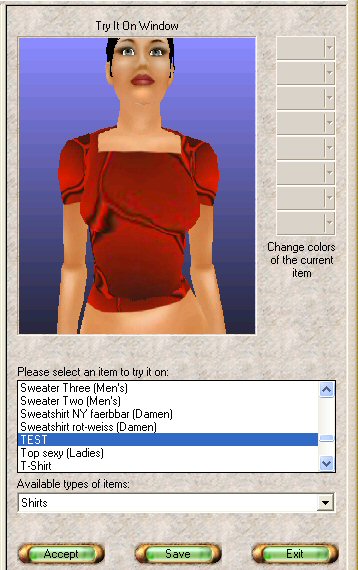
Troubleshooting
If you went into studio and nothing showed up or a part of your body litterally went invisible there is a
few other things to check:
1) Size - paint sizes are as follow
Leg 128x256
Hips 256x128
Head 128x128
Foot
64x64
Chest 256x128
Arm 128x256
Eye
16x16
Neck 64x32
2) Missed something or wrote something wrong in ASM
3) Settings
- there is another setting in PSP for when you are actually saving as BMP. When the save window opens, go to save as BMP,
then there is an "Options" button along with the "save, cancel, etc.... You have to select to save as BMP first then click
"Opions" Make sure "RGB and Windows" is checked. Then save.
If you have any feed back on this tutorial or something's wrong with it please feel free to send me a message
in Rose (xSaharax) or email me. :)
|